
Over the last several month the electronic workshop has suffered from little work with test equipment repair, I think, we have an economic crisis – nobody seems to be interested in keeping their old equipment going, if even the new equipment is idle. More time to spend with traveling and other tasks, including, finally getting a new tool grinder.
For the fabrication of microwave components, like, mechanical filters, test antennas, etc., I am using custom-made tools of HSS (high speed cutting steel), mostly the parts are made of brass of Ni-Cu(-Zn) alloys, so HSS tools are superior for precision machining, compared to, for example carbide tools that don’t hold a sharp edge well.
Usually, we are considering small cutters here, 6, 8, 12 mm diameters. A radius tool, for example, for internal turning or single-edge milling.

…precise angles must be kept to keep the cutting edge going.

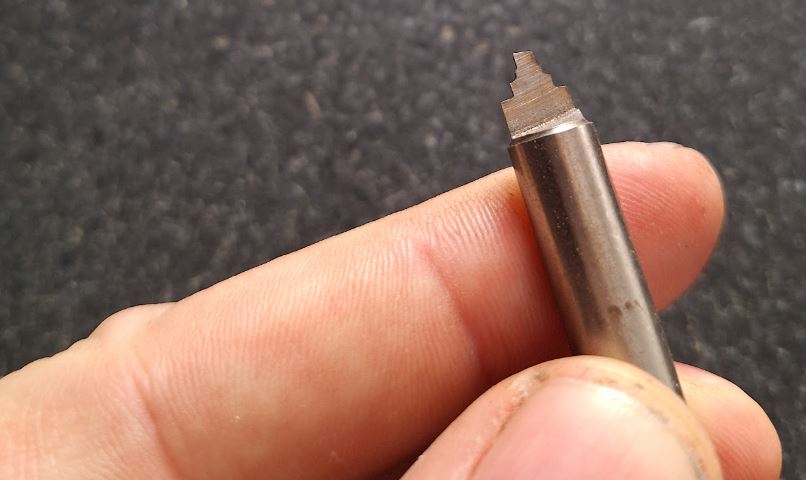
Also, for very tiny pieces, with complicated internal features, single point cutters don’t work well, so I need to resort to strong, custom made step cutters. Note that the shapes are calculated according to electric requirements, but the practical fabrication needs tests and adjustments, and eventually, repeatability, to get good results. Otherwise, the parts will randomly scatter in performance and it is hard to make a set of, for example, 3 pieces, without making 10 pieces scrap, with all the wasted time for machining and, especially, testing.
These tools can be cut by hand on a so-called cutter grinder, earlier introduced by Deckel company of Munich, model “SO”, but now available as import from China, at quite reasonable quality and cost (still, about EUR 1000).

While this little marvel is working very well, it demands outmost focus and consideration when grinding cutters, and is very time consuming to use. Re-grinding tools reproducibly takes practically the same effort than just making a new tool – all angles have to be set again, and all at the same risk of error and misoperation.
In effect, I have been using tools even when a little bit blunt, at a loss of surface quality, burrs (which are extremely bad, because we cannot polish these electric precision parts without destroying the precision, and burrs do show up in refection coefficients and gains).
A solution – we need to get computers and controls involved, in short, CNC. Buying a good CNC tool grinder, 4 axis to also be able to cut and re-sharpen gear cutters or mill cutters, will set you back at least 100 kEUR, including various expensive software options and difficulty in keeping it going without a service contract.
So I have been shopping around for a more affordable option – buying a solid heavy mechanical machine suitable for retrofit (for example, adding a new motion controller – using LinuxCNC on my other machines, fixing some electronics, replacing some or all of the drives and axis motors; but using all the existing mechanical system, the existing grinding spindle, etc.). This search has been underway since last year August, and after finding a machine, even paying, the seller damaged it so badly in his warehouse that he returned the money, still, no machine for me. Eventually, I found this very interesting machine, Made in Germany in the 80s, based on one of the best and solid designs of a manual machine, the SAACKE UW II. The main features are (hardened) roll-bearing supported long table with ball screw, tapered roller bearing A axis (heavy enough for milling), and prismatic cross-slide (trapezoidal screw) on wide-spaced support, along with a 1 mm-per-turn Z adjustment (high precision worm gear).

The introduction of the machine, considered by SAACKE as “the SMALL one”, no less than 80000 DM in 1985… probably equivalent to 90 kEUR today.

The 1 kW spindle is by far enough for the purpose, the machine can also cut very large milling cutters, flat grinding and round grinding (also tapered grinding) is all easily possible because of the 900×140 mm table.
Having found the machine at a reputable dealer in December 2023, it took several month until I could actually buy it, eventually, got it for very reasonable money, just about 2 EUR per kg, shipment included!

It arrived on two pallets, well secured and packaged. But with some parts sticking out. Already in phone conversation with the seller we had the concern of damage, but there was no practical way to transport it here at reasonable effort, rather than just giving it to a commercial carrier on pallets. Surely, I would always suggest you have your machines point-to-point delivered, even drive the truck yourself.

The transport took more than a week, and the carrier probably loaded and unloaded it several times from the truck, eventually, inflicting various damages to the machine. Fortunately, they didn’t drop it altogether.
A broken fan, a completely broken and ripped-off side plate, a broken roller, etc.

Quite some effort to disassemble the parts, find replacements, etc. – commercially, hard to fix, but we are talking about a major retrofit and modification anyway, so we can do it step-by-step in the evening and on (rainy) weekends, not counting all the hours.

One great plus of this machines are the full manuals, even of the motor drivers (using Berger Lahr 51117/50 stepper motors, really big ones!). For some control boards, and the PEP computer (the old brain of this machine), at least connection diagrams.

The main electrics of this machine, very nicely made in a general control cabinet, with all high quality contactors and fuses.

The cabling and connectors are all of the highest quality, costly, heavy duty German-made design.

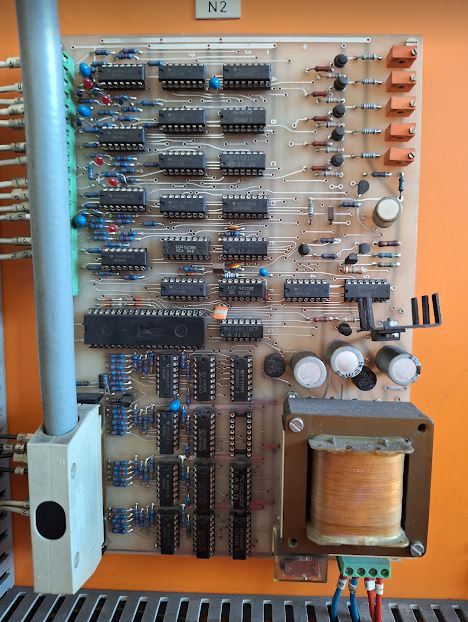
The old control boards, in a nice rack. I am planning to use the existing motors for the table and A axis, the cross-slide and Z (which has one shared driver), haven’t made a decision yet, will just get it working for test reasons I believe.

The feed of cross-slide and Z is done by a feed control system rather than the 2-axis control (table X and rotary A axis that is controlled by the computer, coordinated motion to cut spiral flute cutters).
Soon will power it up. Just a note – this machine didn’t have ground connected, but wired as PEN connection, with a N-PE bridge. So it needed some testing of isolation (which it easily passed), and has already grounded 220 VAC and 24 VDC control voltages (adjusted the tap to get the voltages down a bit – design for 220 V, but I am getting about 230-233 VAC here). So if you get into such adventures with old machines, please make sure to contact someone knowledgeable about electric systems, don’t just plug it in!

Next up will by a study of the motors and drivers, some cleaning, some tests of the mechanics (have some precision granite square here to check for any wear/perpendicularity, and a high precision encoder to check the A axis).


